Applying for a passport or visa can often feel like navigating a minefield of regulations. One of the most critical, and often frustrating, aspects is ensuring your photo meets all the necessary requirements. A rejected photo can cause significant delays and even jeopardize your travel plans. This comprehensive guide, updated for 2026, aims to demystify passport photo requirements, providing clear, actionable advice for both US and international standards. By understanding these guidelines and leveraging available tools, you can ensure your photo is compliant and your application process is smooth and stress-free.
Updated 2026 US Passport Photo Requirements
The U.S. Department of State has strict guidelines for passport photos. These are in place to ensure accurate identification and prevent fraud. Here's a breakdown of the key requirements:
- Size and Dimensions: The photo must be 2x2 inches (51x51 mm).
- Resolution: The photo must have a resolution of at least 300 DPI (dots per inch).
- Background: The background must be plain white or off-white. A seamless white background is preferred for optimal results.
- Lighting: The photo must be evenly lit, with no shadows or glare. Soft, diffused lighting is ideal.
- Pose: You must face the camera directly, with a neutral expression. Both eyes must be open and clearly visible. Avoid smiling or frowning. For further clarification, see our article on whether it is okay to smile in a passport photo.
- Attire: You should wear normal day-to-day attire. Uniforms and clothing that resembles a uniform are prohibited. Ensure your clothing contrasts with the white background.
- Accessories: Hats and head coverings are generally not allowed unless worn daily for religious reasons. In such cases, a signed statement is required, explaining the necessity of the head covering.
- Eyeglasses: As of November 1, 2016, eyeglasses are generally not allowed in U.S. passport photos unless you have a medical reason that prevents you from removing them. If medically necessary, a signed statement from a medical professional is required.
Global Passport Photo Standards
While many countries share similar passport photo requirements, subtle differences exist. These variations often depend on the specific country's regulations and biometric identification systems. Therefore, always check the specific requirements of the country for which you are applying. Here are some key points to consider when preparing passport photos for international applications:
- Size Variations: Some countries might have slightly different size requirements (e.g., 35x45 mm instead of 51x51 mm). Always verify the precise dimensions.
- Background Color: While white is common, some countries may accept light grey or blue backgrounds. Confirm the acceptable background colors for your specific application.
- Head Size: The measurement from the bottom of your chin to the top of your head may have specific limitations, with exact values often specified in millimeters. Pay close attention to these measurements.
- Digital vs. Print: Ensure you understand whether the application requires a physical print or a digital upload, and adhere to the specified file formats and sizes. Digital uploads often have file size limits.
- Country-Specific Guidelines: Always consult the embassy or consulate website of the country you're applying to for the most accurate and up-to-date information. Requirements can change, so recent information is crucial. For example, if you are applying for a German passport, check out how to get your German passport photo in the USA.
DIY Passport Photo Tips & Tricks
Taking your own passport photo at home can save time and money, but it requires careful attention to detail. Here are some practical tips to ensure compliance:
- Lighting is Key: Use natural light whenever possible. Position yourself near a window but avoid direct sunlight, which can create harsh shadows. If natural light isn't available, use soft, diffused artificial light.
- Background Setup: Use a plain white wall or hang a white sheet or poster board behind you. Make sure there are no patterns, textures, or shadows visible. A clean and uncluttered background is essential.
- Camera Positioning: Use a tripod or have someone hold the camera at eye level to avoid distortion. Ensure the camera is positioned directly in front of you, not at an angle.
- Posing Techniques: Maintain a neutral expression, look directly at the camera, and keep your shoulders relaxed. Avoid tilting your head or slouching.
- Multiple Shots: Take several photos to increase your chances of getting a compliant one. Review them carefully before choosing the best. Use a photo editing tool to crop and resize the photo to the correct dimensions. Also, keep in mind the size of passport photos.
Lighting Tips
Proper lighting is crucial for a compliant passport photo. Poor lighting is a frequent cause of rejection.
- Avoid shadows on your face and in the background. Use even, diffused lighting to eliminate shadows.
- Ensure even illumination across your face. The lighting should be balanced, with no hot spots or dark areas.
- Do not use flash, as it can cause red-eye or harsh reflections. Natural or soft artificial lighting is preferable.
Background Set-Up
Setting up the proper background is simple and inexpensive. However, it is one of the most important factors in getting your photo approved.
- Use a white sheet or poster board. Ensure the material is clean and wrinkle-free.
- Ensure the background is smooth and free of wrinkles or patterns. Iron the sheet if necessary to remove any creases.
- Make sure the background is evenly lit. Use additional lighting if needed to eliminate shadows.
Dress Code and Appearance Guidelines
What you wear and how you present yourself in your passport photo matters. Adhering to the dress code helps ensure accurate identification and prevents delays. Here are some guidelines to follow:
- Clothing: Wear everyday clothing. Avoid uniforms or clothing that resembles a uniform. Choose clothing that contrasts with the white background to avoid blending in. To learn more about what is acceptable attire, review our guide on what to wear for a US passport photo.
- Jewelry: Simple jewelry is generally acceptable, but avoid large or distracting pieces that might obscure your face. Remove any jewelry that creates reflections.
- Hairstyles: Your hair should not obscure your face. Keep hair off your eyebrows and ensure your eyes are fully visible. Avoid hairstyles that are too voluminous or that cover any part of your face.
- Makeup: Makeup is acceptable as long as it does not significantly alter your appearance. Avoid heavy makeup that changes your facial features.
- Facial Hair: If you normally wear a beard or mustache, you should include it in your photo. Ensure your facial hair is neatly trimmed.
What NOT to Wear
Knowing what not to wear is just as important as knowing what to wear. Avoiding these items will help ensure your photo is compliant.
- Avoid busy patterns or distracting prints. Solid colors are best.
- Do not wear anything that obscures your face, such as a hat or scarf (unless worn daily for religious reasons). If worn for religious reasons, provide a signed statement.
- Do not wear dark glasses or tinted lenses. Remove eyeglasses unless medically necessary, with supporting documentation.
Addressing Complex Situations
Certain situations require extra care when taking passport photos. Understanding these exceptions can help you navigate the process more smoothly.
Infants and Children
- Infants should be photographed lying on a plain white sheet or sitting in a car seat covered with a white cloth. Ensure the background is smooth and free of distractions.
- Ensure no one else is visible in the photo, including hands holding the baby. If necessary, use a prop to support the baby's head, but ensure the prop is not visible in the photo.
- Children should follow the same guidelines as adults, with a neutral expression and both eyes open. This can be challenging, so be patient and take multiple shots. For more information, review our article on tips for applying for your child's passport.
Individuals with Disabilities
- If you use mobility aids or have other specific needs, make sure these do not obstruct your face or create shadows. Ensure your face is fully visible and that the aid does not distort your features.
- Communicate any special requirements to the photo taker beforehand. Explain your needs and how they might affect the photo.
Medical Conditions
- If you must wear a head covering for medical reasons, include a signed statement from your doctor. The statement should explain the medical necessity of the head covering.
- Ensure your face is still fully visible. The head covering should not obscure any part of your face.
Common Mistakes to Avoid
Even with careful planning, mistakes can happen. Being aware of these common errors can save you time and frustration. Check out our article highlighting the top reasons your ID photo could be rejected.
- Incorrect Size or Resolution: Double-check the specifications and adjust your camera settings accordingly. Use a photo editing tool to resize the photo to the correct dimensions.
- Shadows or Glare: Pay attention to lighting and avoid harsh shadows or reflections. Adjust your lighting setup to eliminate these issues.
- Red-Eye: Disable flash or use red-eye reduction settings. Alternatively, use a photo editing tool to remove red-eye.
- Obstructed Face: Ensure your hair, clothing, or accessories do not cover your face. Adjust your hairstyle or clothing to ensure your face is fully visible.
- Non-Neutral Expression: Practice a relaxed, neutral expression before taking the photo. Avoid smiling, frowning, or squinting.
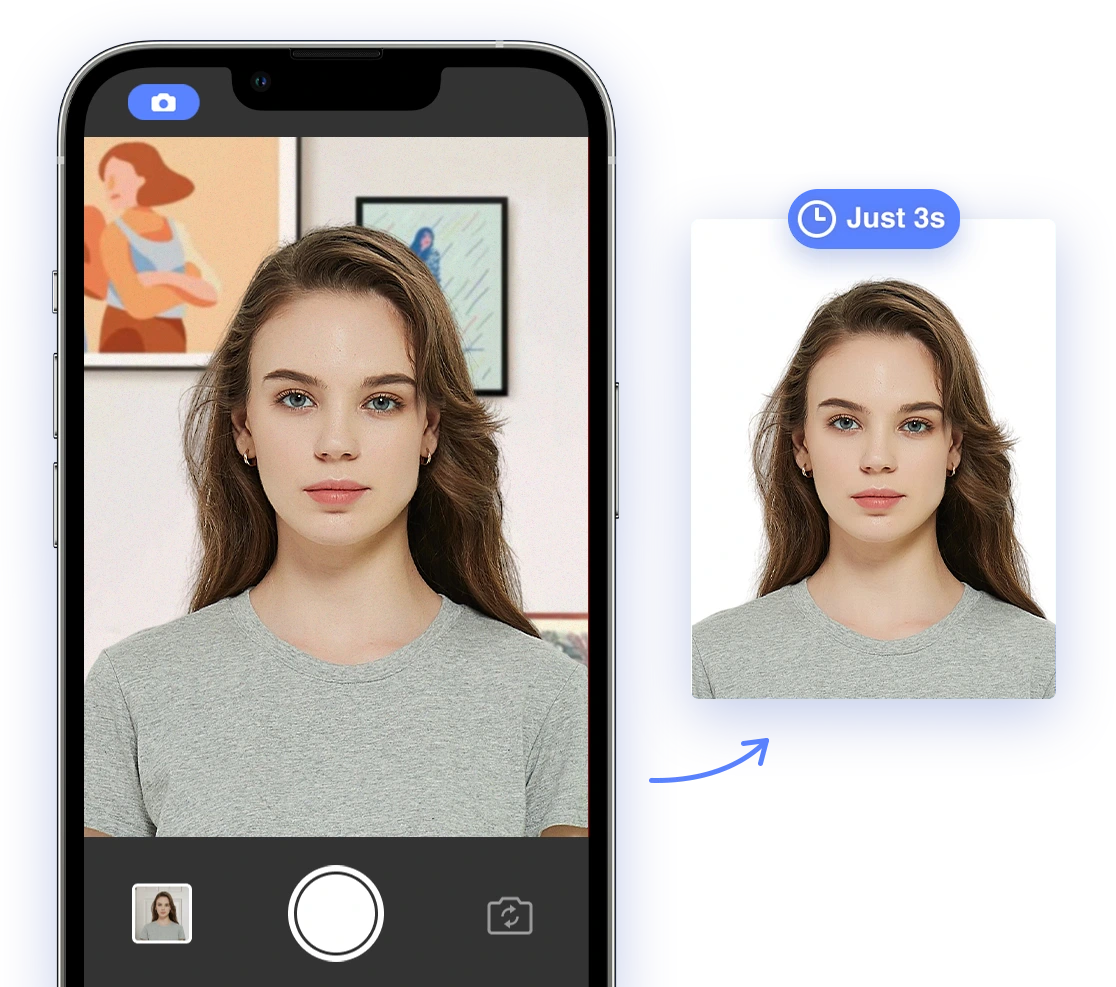
Leveraging AI Passport Photo Tools
AI-powered passport photo tools can significantly simplify the process and ensure compliance. These tools offer a range of features that can help you create a perfect passport photo quickly and easily. Here are some typical features:
- Automatic Background Removal: Replaces non-compliant backgrounds with a plain white one. This feature ensures your background meets the required specifications.
- Biometric Analysis: Checks the photo for compliance with biometric standards, such as head size and eye position. This helps ensure your photo meets the necessary biometric requirements.
- Lighting and Color Correction: Adjusts lighting and color to meet official requirements. This ensures your photo is properly illuminated and has accurate colors.
- Size and Resolution Optimization: Automatically resizes and optimizes the photo for upload or printing. This ensures your photo meets the size and resolution requirements.
Benefits of Using AI
Using AI offers several key advantages when creating a passport photo:
- Ensures compliance with complex biometric requirements. AI algorithms are trained to recognize and adhere to strict biometric standards, minimizing the risk of rejection.
- Saves time and effort by automating the editing process. AI tools automate many of the manual tasks involved in creating a compliant passport photo, saving you time and effort.
- Reduces the risk of rejection due to technical errors. By automating the process and ensuring compliance with all requirements, AI tools significantly reduce the risk of rejection due to technical errors. For example, you can use AI to review if dark eyes are acceptable in passport photos.
Global ID Photo Guide
When applying for documents in different countries, global ID photo guides will be beneficial. These ID photo guides will help you meet the local ID requirements, regardless of where you are applying.
- Ensure you are following the guidelines set by the specific country you are applying for documentation in.
Actionable DIY tips
Having DIY tips for when you are abroad can save money and time. Learning how to take your own ID photo can be a key asset, especially when you're far from professional photo services. Another option is to learn how to take your passport photo at home.
- Pack a portable white background. A small, foldable white sheet or poster board can be easily packed and used as a background for your photos.
- Use a smartphone with a high-resolution camera. Most modern smartphones have excellent cameras that can capture high-quality photos.
- Download an AI passport photo app. These apps can help you ensure your photos meet the specific requirements of different countries.
The US Passport Card
The US Passport card can be a budget-friendly travel option for U.S. citizens traveling to Canada, Mexico, and select Caribbean countries. Although it has several limitations, it allows for easier land and sea border crossings and is cheaper than a physical passport book. It's a convenient alternative for frequent travelers to these regions. Learn more about the US Passport Card on the official government website.
The Importance of High-Quality Photo Paper
Selecting the right photo paper guarantees a high-quality photo that is more acceptable and durable. The quality of the paper affects the clarity and longevity of the photo. Here are the most common types:
- Glossy Photo Paper: Enhances color and sharpness. Ideal for photos that need to look vibrant and detailed.
- Matte Photo Paper: Reduces reflections and fingerprints. Best for photos that will be handled frequently or displayed in bright environments.
Passport photo and Facial Piercings
In many situations, facial piercings are acceptable in passport photos, as long as they do not obstruct any facial features or create excessive glare. However, it's essential to ensure that piercings do not violate any specific requirements of the issuing country. For more guidance, consult government guidelines for specific rulings. If you are unsure, it is best to avoid facial piercings to guarantee there won't be an issue with your passport application.
What NOT to wear in your Passport Photo
Knowing what not to wear in your passport photo can save time and rejection. Avoiding these common fashion faux pas can increase the chances of your photo being accepted. Following this guide will help ensure you are meeting all requirements. For example, do not wear headphones, according to this guide.
- Avoid busy patterns or distracting prints. Solid colors are best.
- Do not wear anything that obscures your face, such as a hat or scarf (unless worn daily for religious reasons). If worn for religious reasons, provide a signed statement.
- Do not wear dark glasses or tinted lenses. Remove eyeglasses unless medically necessary, with supporting documentation.
Conclusion
Navigating passport photo requirements doesn't have to be a daunting task. By understanding the guidelines, utilizing available tools like AI Passport Photo, and paying attention to detail, you can ensure your photo meets all necessary standards. Whether you choose to take your photo at home or use a professional service, this comprehensive guide provides you with the knowledge and confidence to achieve a compliant passport photo and a smooth application process. Remember to always double-check the specific requirements of the country you are applying to, and leverage AI-powered tools for added assurance. Get started today and streamline your passport application process!
Ready to get started? Try our AI Passport Photo tool today and create a perfect, compliant photo in seconds!