Applying for US citizenship is a significant milestone, filled with paperwork, requirements, and deadlines. Among these, providing a compliant photo ID might seem like a small detail, but it's a critical one. A non-compliant photo can lead to delays or even rejection of your application. This comprehensive guide is here to simplify the process, providing you with everything you need to know about the USCIS photo requirements for naturalization in 2024-2025. We'll cover DIY tips, expert advice, and how AI-powered tools can ensure your photos are flawless, setting you on the path to a smooth citizenship journey.
Understanding USCIS Photo Requirements
The United States Citizenship and Immigration Services (USCIS) has stringent requirements for photos submitted with naturalization applications. These requirements ensure that your photo accurately represents you and can be used for biometric identification. Let's delve into a detailed breakdown to make sure you’re fully prepared. For more information on general questions and answers about U.S. passport photos, click here.
Detailed Specifications
- Size and Dimensions: The photo must be 2x2 inches (51x51 mm). Learn more about the correct passport photo size in the U.S.
- Background: The background must be plain white, free of any shadows or distractions. For additional information on ensuring a proper background, see our guide on decoding the US passport photo background.
- Image Quality: The photo must be clear, in focus, and free from shadows or glare. Retouching should be minimal and not alter your natural appearance. See our guide on passport photo retouching to understand what enhancements are permitted.
- Recency: The photo must be taken within the last six months to accurately reflect your current appearance.
- Head Size: The head should measure 1 to 1 3/8 inches (25 to 35 mm) from the top of the head to the bottom of the chin. This ensures proper scaling for biometric analysis.
- Pose: You must face the camera directly with a neutral expression. Ensure your eyes are open and clearly visible. No tilting or angled poses are allowed.
- Attire: Normal, everyday attire is acceptable. Avoid uniforms or clothing that could be seen as misrepresenting your identity. Religious attire is permitted but must not obscure your facial features. For more details, check out our article on what to wear for a US passport photo.
Why Adherence Matters
Failing to meet these specifications can result in your application being delayed or rejected. USCIS uses these photos for identity verification and security purposes, so accuracy is paramount. A clear, compliant photo ensures that the process moves forward without unnecessary hold-ups. Take the time to get it right, and save yourself potential headaches down the road. Learn about the top reasons for ID photo rejection to avoid common mistakes.
DIY Photo Tips and Techniques
Taking your own USCIS photos at home can be a cost-effective and convenient option. With a little preparation and attention to detail, you can achieve professional-quality results. Here’s how to do it right:
Setting Up Your Photo Shoot
- Lighting: Use natural light whenever possible. Position yourself facing a window, but avoid direct sunlight, which can cause harsh shadows and overexposure. The goal is even illumination across your face. If natural light is not available, use two softbox lights placed at 45-degree angles to your face to illuminate it evenly. Read our detailed guide on how to get the best passport photos.
- Background: Find a plain white wall or hang a white sheet or poster board behind you. Make sure there are no patterns, textures, or shadows visible. A clean, uncluttered background is essential.
- Camera: Use a smartphone or digital camera with a high-resolution setting (at least 1200 x 1200 pixels). Ensure the lens is clean and free from smudges. A stable camera is key to a sharp image.
Posing and Expression
- Face the Camera: Look directly at the camera with your head level and your shoulders squared. Your entire face should be visible.
- Neutral Expression: Maintain a neutral expression. No smiling, frowning, or raising your eyebrows. Relax your facial muscles. Also, explore our article answering is it okay to smile in a passport photo?
- Eyes Open: Keep your eyes open and visible. Avoid squinting or closing your eyes. If you have long hair, make sure it doesn't cover your eyes.
Taking the Shot
- Distance: Position the camera about 4-6 feet away from you. This distance helps prevent distortion. Use a tripod or have someone else take the photo to ensure stability.
- Framing: Frame the shot so that your head and shoulders are visible, with the correct head size as specified by USCIS (1 to 1 3/8 inches from the top of the head to the bottom of the chin). Leave a small amount of space above your head.
- Multiple Shots: Take several photos to ensure you have a few good options to choose from. Slight variations in lighting or expression can make a big difference. Review the photos on a larger screen to check for clarity and compliance.
Dress Code and Appearance Guidelines
Your attire and overall appearance in the photo should be professional and accurately represent your everyday look. This section clarifies what’s acceptable and what to avoid.
Acceptable Attire
- Everyday Clothing: Wear your normal, everyday clothing. There are no specific requirements, but avoid anything too casual (like a tank top) or too formal (like a tuxedo). Choose clothes that are comfortable and representative of your usual style. Read more on what to wear for a US passport photo.
- Avoid Uniforms: Do not wear uniforms, as these can misrepresent your identity. Exceptions are made for religious attire (see below), provided it doesn't obscure your facial features.
Accessories and Jewelry
- Minimal Jewelry: Keep jewelry to a minimum. Small earrings or necklaces are generally acceptable, but avoid anything large, reflective, or distracting. The focus should be on your face, not your accessories. Read our helpful information about wearing jewelry in passport photos.
- Eyeglasses: As of November 1, 2016, eyeglasses are generally no longer allowed in USCIS photos unless you have a medical reason. If eyeglasses are medically necessary, you must submit a signed statement from a doctor explaining why you cannot remove them.
Hairstyles and Makeup
- Hairstyle: Your hairstyle should not obscure your face. Keep hair off your forehead so that your facial features are fully visible. Avoid overly voluminous styles that could cast shadows. Please review the requirements for hair on passport photos.
- Makeup: Makeup is allowed, but it should be natural-looking. Avoid heavy makeup that significantly alters your appearance. The goal is to enhance your features, not transform them. Also, read our section about makeup in driver's license photos, many rules applies to all ID photos.
Addressing Unique Situations
Certain situations require special attention to ensure compliance with USCIS photo requirements. This section provides guidance for specific circumstances.
Infants and Children
- No Other Person: The child must be the only person in the photo. No parents or other individuals should be visible.
- Eyes Open: The child’s eyes must be open. This can be challenging with infants, but try to capture the photo when the baby is alert. Use toys or sounds to get their attention.
- Laying Down: For infants, you can lay them down on a plain white sheet and take the photo from above. Ensure there are no shadows on their face.
- Supporting the Child: If you need to support the child, ensure that your hands are not visible in the photo. You can try using a white blanket to cover your hands.
Read our tips for applying for your child's passport.
Individuals with Disabilities or Medical Conditions
- Medical Devices: If you wear a medical device (such as a hearing aid or prosthetic), it is generally acceptable in the photo, as long as it does not obscure your face. Provide documentation if needed.
- Head Coverings: If you wear a head covering for religious or medical reasons, you must submit a signed statement explaining the reason for the head covering. The head covering should not obscure your face, and your hairline and forehead should be visible as much as possible.
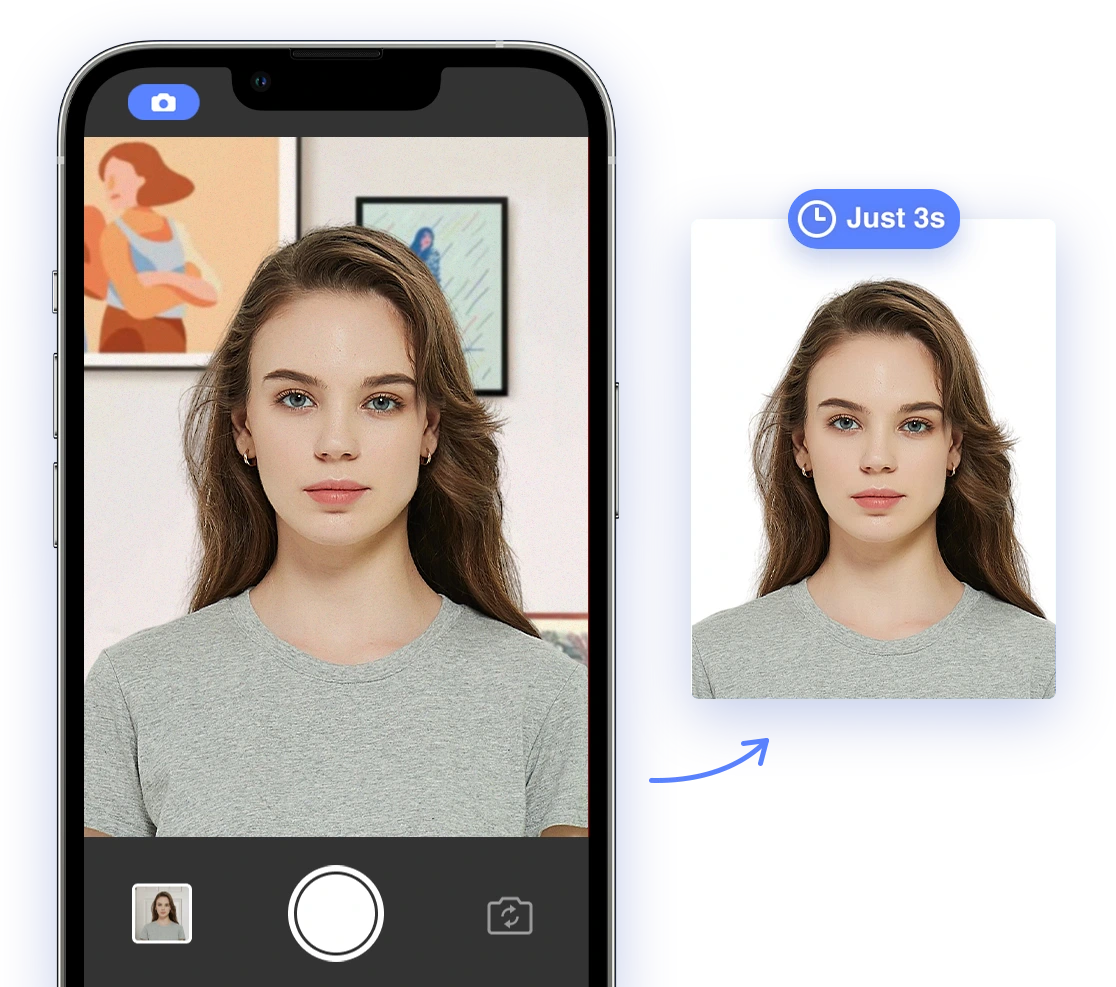
Leveraging AI-Powered Tools
AI Passport Photo is a powerful tool that can help you ensure your photos meet all USCIS requirements quickly and easily. It offers automated compliance checks and simplifies the entire process. Here’s how to use it:
- Download the App: Download AI Passport Photo from the App Store or Google Play.
- Upload Your Photo: Upload the photo you took at home directly into the app.
- Automatic Adjustments: The app will automatically crop, resize, and adjust your photo to meet USCIS specifications, saving you time and effort.
- Compliance Check: The app will check your photo for compliance with all USCIS requirements, including background color, head size, facial positioning, and image quality. It identifies and flags any issues that need to be addressed.
- Download and Print: Once your photo is compliant, you can download it and print it at home or at a local photo printing service like Walgreens or CVS. You'll receive a perfectly sized digital template for easy printing. Check if there's a Walgreens passport photo coupon available.
AI Passport Photo simplifies the process, saving you time, reducing stress, and ensuring your photos are perfect for your citizenship application.
Troubleshooting Common Issues
Even with careful planning, you might encounter issues when taking your USCIS photos. Here are some common problems and how to solve them:
- Poor Lighting: Use natural light or softbox lights to eliminate shadows and ensure even illumination. Avoid harsh lighting that causes glare.
- Incorrect Background: Use a plain white wall or sheet. Edit the background using a photo editing tool if necessary, but ensure it remains a solid, uniform white.
- Non-Compliant Attire: Wear everyday clothing and avoid uniforms or distracting accessories. Adhere to the dress code guidelines outlined above.
- Red Eye: Disable the flash or use red-eye reduction software if needed. The AI Passport Photo app can often correct this automatically.
- Blurry Photo: Ensure the camera is stable and the subject is in focus. Retake the photo if necessary, paying attention to camera settings and stability. Also, read tips for capturing a great photo using your iPhone.
- Incorrect Size: Use AI Passport Photo to automatically crop and resize your photo to the correct dimensions (2x2 inches).
USCIS Updates and Changes for 2024-2025
Stay informed about any updates or changes to the USCIS photo guidelines for the year 2024-2025. Regularly check the USCIS website or reliable immigration resources for the latest information. Being aware of any modifications ensures your application remains compliant.
The Future of USCIS Photos and AI
As technology advances, AI is expected to play an even greater role in the creation and verification of USCIS photos. Future innovations may include:
- Automated Compliance Checks: AI-powered tools could automatically verify every aspect of the photo in real-time, providing instant feedback and guidance.
- Enhanced Security: Biometric data embedded in the photo could provide an additional layer of security, reducing the risk of fraud.
- Streamlined Application Process: Integration with online application portals could allow for seamless photo submission and verification, further simplifying the process for applicants.
Real-Life Examples
To illustrate the importance of photo compliance, here are examples of accepted and rejected photos and how to fix the rejected ones:
- Accepted Photo: A clear, well-lit photo with a plain white background, correct head size, and neutral expression. The applicant is wearing everyday clothing and no distracting accessories.
- Rejected Photo 1: A photo with shadows on the face due to poor lighting. Solution: Use better lighting to eliminate shadows and ensure even illumination.
- Rejected Photo 2: A photo with an incorrect background color (e.g., gray or patterned). Solution: Edit the background to plain white using a photo editing tool or retake the photo with a proper white background.
- Rejected Photo 3: A photo with the applicant smiling. Solution: Retake the photo with a neutral expression, keeping your facial muscles relaxed.
By examining these examples, you can better understand what to avoid and how to achieve a compliant photo.
Expert Advice and Insights
To provide additional insight, here are some quotes or tips from immigration experts and USCIS officials:
- “Ensuring your photos meet all USCIS requirements is a simple but crucial step in the naturalization process. Don't let a preventable mistake cause unnecessary delays.” – Immigration Attorney Jane Doe
- “Use reliable tools like AI Passport Photo to ensure your photos are compliant. It can save you time and stress and provide guidance with your application.” – USCIS Official John Smith
Conclusion
Obtaining US citizenship is a significant achievement, and ensuring your application is complete and accurate is key. A compliant photo is a small but essential part of that process. By following this comprehensive guide and using reliable tools like AI Passport Photo, you can confidently create compliant photos that meet all USCIS requirements. Take the time to prepare, follow the guidelines, and start your journey to citizenship on the right foot with perfect photos. Good luck! And, if your photo is rejected, learn what to do if your passport photo is rejected.