Understanding Official USCIS Photo Requirements
USCIS photo requirements are in place to ensure clear identification and facilitate the efficient processing of your application. Failing to meet these requirements is a common reason for application delays. Here's a detailed look at the key specifications:
- Size: You will need to submit two identical photos, each 2x2 inches (51x51 mm) in size.
- Background: The background must be plain white and free of any shadows or distracting elements. A clean, white backdrop is essential. For more information, see our guide on decoding US passport photo backgrounds.
- Head Size: The head height (measured from the top of your head, including hair, to the bottom of your chin) should be between 1 inch and 1 1/3 inches (25 mm and 35 mm). Ensuring the correct head size is crucial for biometric identification.
- Pose: You must face the camera directly, with a neutral expression (no smiling or frowning). Both ears should be clearly visible, unless they are covered by recognized religious headwear. Your face should be fully visible.
- Eyeglasses: As of November 1, 2016, eyeglasses are generally not allowed in USCIS photos, unless you have a medical condition that requires them. If eyeglasses are medically necessary, you must submit a signed statement from a licensed medical professional explaining the necessity. Make sure your eyes are clearly visible without any glare or obstruction from the glasses.
- Attire: You should wear normal street attire. Uniforms or clothing that resembles a uniform are generally not allowed, except for recognized religious attire (see below). Choose everyday clothing that accurately represents your appearance. For more details, review our passport photo dress code guide.
- Head Coverings: Head coverings are permitted only if they are part of recognized traditional religious attire that is customarily or required to be worn continuously in public. The head covering must not obscure your face, and you must submit a signed statement affirming that the head covering is part of your religious practice. The face should be fully visible, from hairline to chin.
- Quality: The photo must be clear, in focus, and free from blemishes or pixelation. It should be printed on matte or glossy photo paper. Avoid using filters or making any digital enhancements that alter your appearance.
- Date: The photos must be taken within the last six months to accurately reflect your current appearance. Avoid using older photos, even if they still look like you.
How AI Passport Photo Simplifies USCIS Compliance
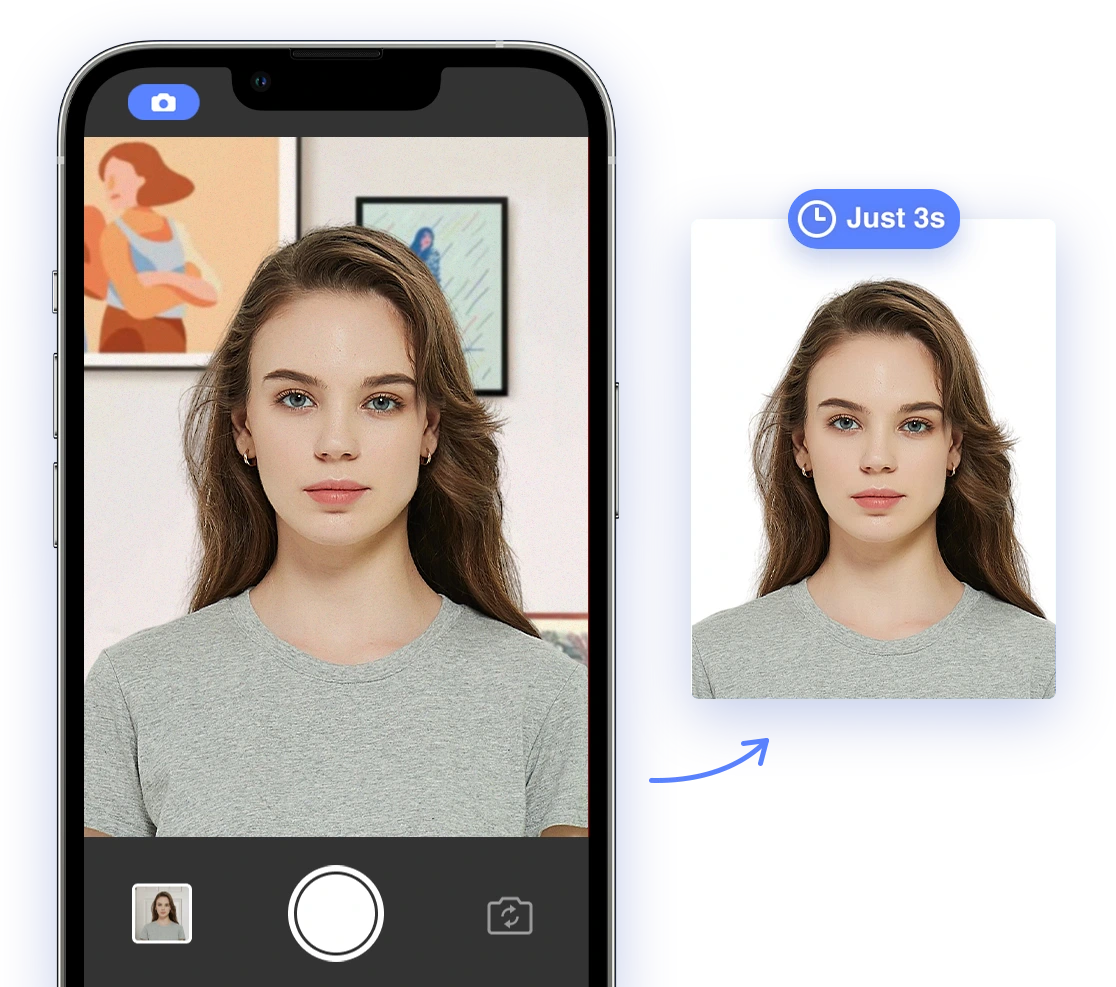
Meeting all these requirements can feel overwhelming, especially when trying to take the photo yourself. AI Passport Photo offers a user-friendly and reliable solution. Our AI-powered tool automatically checks and adjusts your photos to ensure they meet all USCIS specifications, including size, background color, head size, pose, and more. Here's how it works:
- Upload Your Photo: Simply upload a photo taken with your smartphone or digital camera. Ensure the photo is well-lit and clear.
- AI Analysis: Our advanced AI algorithms analyze your photo, accurately detecting facial features and assessing compliance with all USCIS requirements. This includes checking the background, head size, and pose.
- Automatic Adjustments: The tool automatically crops, resizes, and adjusts the background color to ensure your photo perfectly meets the USCIS specifications. Any necessary adjustments are made seamlessly.
- Compliance Check: After adjustments, the tool runs a final compliance check to verify that your photo meets all the necessary criteria. This ensures that your photo is 100% compliant.
- Download and Print: Once your photo is verified, you can easily download the compliant photo and print it at home or at a local photo lab. You'll receive a correctly sized digital file ready for printing.
CTA: Ensure your USCIS photos are perfect with AI Passport Photo.
Step-by-Step Guide to Taking a Compliant Photo at Home
If you prefer to take your own photos, you can still achieve a compliant result by following these detailed, step-by-step instructions. This approach requires careful attention to detail, but it can be a cost-effective option:
- Choose the Right Location: Select a well-lit area in your home with a plain white background. A white wall or a white sheet hung behind you works well. Ensure there are no shadows on your face or the background. Proper lighting is key to avoiding a rejection.
- Set Up Your Camera: Use a smartphone or digital camera with a resolution of at least 600x600 pixels. Place the camera on a tripod or stable surface to avoid blurry photos. Blurry photos are a common reason for rejection.
- Position Yourself Correctly: Stand or sit directly facing the camera, with your shoulders squared and your head level. Maintain a neutral expression and look directly at the lens. Avoid tilting your head or slouching.
- Check the Lighting: Ensure the lighting is even and illuminates your face without creating harsh shadows. Natural daylight is best, but avoid direct sunlight, which can create harsh shadows. Consider using a diffused light source if natural light is unavailable.
- Take Multiple Shots: Take several photos to ensure you have options to choose from. Review the photos carefully to select the best one, paying close attention to the background, lighting, and your expression.
- Use AI Passport Photo for Verification: Even if you take the photos yourself, it's highly recommended to upload your chosen photo to AI Passport Photo to verify compliance and make any necessary adjustments. This step ensures that your photo meets all the stringent requirements.
Common Mistakes to Avoid
Awareness of common mistakes can help you avoid unnecessary delays. Here are some of the most frequent errors that lead to photo rejection by USCIS:
- Incorrect Size: Always double-check that your photos are exactly 2x2 inches (51x51 mm). Using the wrong size is a very common mistake.
- Non-White Background: The background must be plain white, without any patterns or shadows. Avoid off-white or colored backgrounds.
- Incorrect Head Size: Ensure the head height is within the specified range (1 inch to 1 1/3 inches). Photos that don't meet this requirement are often rejected.
- Smiling or Frowning: Maintain a neutral expression with your mouth closed. Smiling or frowning can distort your facial features and lead to rejection.
- Wearing Eyeglasses (Without Medical Justification): Remember that eyeglasses are generally not allowed unless medically necessary, and you must provide a doctor's note.
- Wearing a Uniform or Non-Religious Head Covering: Only religious head coverings are permitted, and they must not obscure your face. Avoid wearing any other type of hat or head covering.
- Poor Photo Quality: Photos must be clear, in focus, and free from pixelation or blemishes. Use a high-resolution camera and good lighting to avoid this issue.
- Old Photos: Make sure your photos were taken within the last six months to accurately reflect your current appearance. Using older photos can lead to rejection.
Specific Considerations for Unique Situations
Certain situations require extra attention to ensure compliance. Here are some specific considerations:
- Wearing Glasses: If you must wear glasses for medical reasons, provide a signed statement from your doctor. Ensure the glasses do not obscure your eyes or create glare. Consider removing the lenses if possible to avoid glare.
- Religious Head Coverings: Ensure your head covering is part of recognized traditional religious attire and does not obscure your face. Provide a signed statement affirming that the head covering is part of your religious practice. Make sure your face is fully visible, from hairline to chin.
- Children's Photos: For infants and small children, it can be challenging to get them to sit still and look at the camera. Try placing them in a car seat covered with a white sheet or having someone stand behind you to get their attention. Ensure the child's face is fully visible and they are not wearing any head coverings (unless for religious reasons).
CTA: Need help with your child's USCIS photo? AI Passport Photo makes it easy.
Printing and Submission Guidelines
The final steps involve printing and submitting your compliant photos. Here are some important guidelines:
- Printing: Print your photos on high-quality matte or glossy photo paper. Use a professional printing service or a high-resolution color printer. Low-quality prints are not acceptable. See our article on choosing the perfect passport photo paper.
- Submission: Place the photos in a small envelope and attach it to your application form. Do not staple or paperclip the photos, as this can damage them.
What to Do If Your Photo Is Rejected
Even with careful preparation, your photo could be rejected. Here's what you should do if that happens:
- Review the Rejection Notice: Carefully read the rejection notice to understand the specific reason for the rejection. This will help you avoid making the same mistake again.
- Correct the Issue: Address the specific problem identified in the notice, such as incorrect size, background, or expression.
- Retake the Photo: Take a new photo following all the guidelines outlined in this article, paying close attention to the reason for the rejection.
- Resubmit Your Application: Resubmit your application with the corrected photos as soon as possible. Delays can affect the processing of your application.
Leveraging AI for Compliance
AI-powered tools, like AI Passport Photo, offer an invaluable advantage in ensuring photo compliance. These tools automatically check and adjust photos to meet the stringent requirements, significantly reducing the risk of rejection. By leveraging AI, applicants can streamline the photo preparation process and minimize potential delays in their citizenship journey. It’s a smart way to avoid common errors and ensure your application proceeds smoothly. Read more about mastering AI passport photos for advanced tips.
Finding Compliant Photo Services Near You
While AI Passport Photo provides a convenient and reliable online solution, you may also consider using professional photo services. Look for services that guarantee USCIS compliance and have experience with immigration photo requirements. Some options include:
- Pharmacies: CVS, Walgreens, and Rite Aid often offer passport photo services. Inquire about their experience with USCIS photos.
- Shipping Stores: FedEx and UPS stores may also provide photo services. Ask if they guarantee compliance with USCIS requirements.
- Professional Photo Studios: Local photo studios specializing in passport and ID photos are often a good choice. Verify that they are familiar with USCIS specifications.
2024-2025 Updates
As of the latest updates, USCIS continues to emphasize the importance of adhering to the guidelines outlined in this article. As of July 2024, there have been no significant changes to the photo requirements for 2024-2025. However, it's always a good idea to check the official USCIS website for the most up-to-date information before submitting your application. Staying informed ensures a smooth and trouble-free application process.
By following these guidelines and utilizing AI-powered tools like AI Passport Photo, you can ensure your photos meet all USCIS requirements and avoid unnecessary delays in your journey to becoming a US citizen. Good luck! We hope this guide has been helpful in clarifying the USCIS photo requirements for your citizenship application.
Image Requirements:
- A sample compliant photo showcasing correct size, background, and pose.
- An example of a non-compliant photo illustrating common mistakes (e.g., shadows, incorrect background, eyeglasses).
- A screenshot of AI Passport Photo interface demonstrating the automated compliance check.
Schema Markup Suggestion:
{"@context": "https://schema.org",
  "@type": "Article",
  "headline": "USCIS Photo Requirements for Citizenship: A 2024-2025 Guide",
  "description": "A comprehensive guide to USCIS photo requirements for citizenship applications in 2024-2025, offering practical tips, common mistakes to avoid, and how AI-powered tools can simplify the process.",
  "image": "URL_TO_YOUR_FEATURED_IMAGE",
  "author": {
    "@type": "Organization",
    "name": "AI Passport Photo"
  },
  "datePublished": "2024-07-26",
  "dateModified": "2024-07-26"
}
Social Sharing Elements:
Include social sharing buttons (Facebook, Twitter, LinkedIn) at the beginning and end of the article to encourage sharing.